Tile Roof Solar Panels Guide: Mounting Methods, Costs, and Tile Replacement
Complete homeowner guide to installing solar panels on tile roofs. Compare tile hooks, replacement mounts, comp-out flashing, and project labor costs.

Tile roofs are known for their timeless beauty, durability, and classic style. Whether made of Spanish clay, curved terracotta, concrete, or slate, tile roofs can easily last fifty to one hundred years. They resist fire, withstand desert heat, and handle coastal storms with ease.
When homeowners with tile roofs explore solar energy, they often have concerns. Will heavy equipment break the fragile tiles? Will drilling holes cause roof leaks? Do solar companies charge extra to work on tile?
The short answer is yes, you can safely install solar panels on a tile roof. However, installing solar on tile requires special hardware, careful planning, and skilled installers. Roof tiles are designed to shed rainwater, not support heavy equipment. Installers must connect solar mounts directly into the wood framing beneath the tiles without damaging the roof waterproofing.
This complete guide explains how tile roof solar installations work, compares the top mounting techniques, details typical costs, and shows you how to protect your roof warranty.
Direct Structural Rafter Attachment
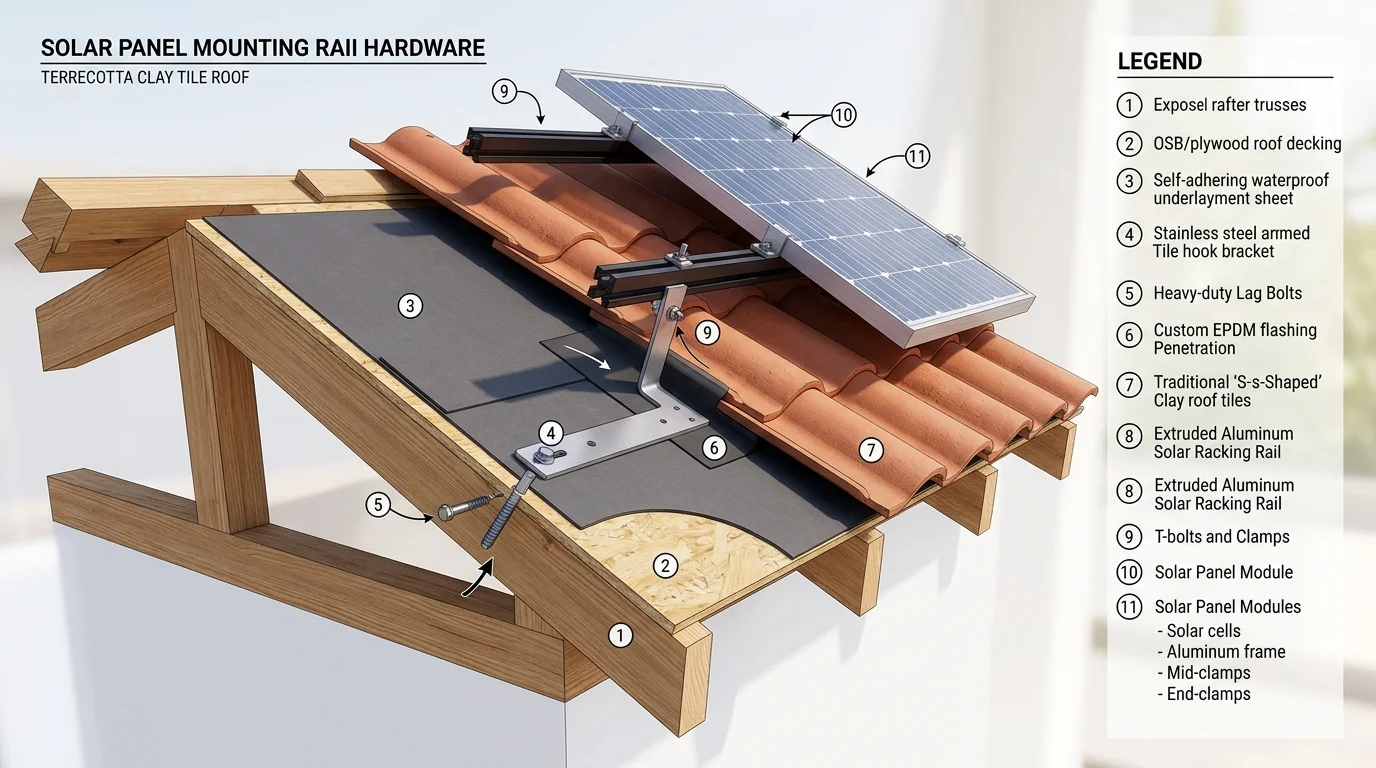
Roof tiles cannot bear the weight of a solar array. Experienced installers attach heavy-duty steel brackets directly into the structural wood rafters beneath the underlayment. The bracket slides cleanly under the curved tiles, keeping the roof watertight.
Why Tile Roofs Require Special Solar Handling
Installing solar panels on standard asphalt shingles is straightforward. Workers drill lag screws through shingles, slide thin metal flashing underneath, and seal the opening with sealant.
Tile roofs are very different. They require careful craftsmanship for three main reasons:
1. Tiles Are Fragile and Brittle
Clay tiles can crack under the weight of a worker. Even walking across a tile roof requires special training. Installers must step only on the reinforced lower thirds of overlapping tiles to distribute weight, or use foam walkway pads. If an inexperienced crew walks carelessly across your roof, dozens of tiles can shatter before work even begins.
2. Tiles Shed Water, but Underlayment Blocks It
Many people assume roof tiles form a waterproof seal. In reality, tiles act like an umbrella that sheds the bulk of rain and sun. The real waterproof barrier is the sheet of roofing felt or synthetic underlayment fastened to the plywood decking underneath. Any solar bracket must pierce the underlayment, which means installers must seal and flash that penetration perfectly.
3. The Underlayment Lifespan Mismatch
Quality concrete and clay tiles can last seventy-five to one hundred years. However, traditional asphalt-saturated underlayment beneath those tiles typically lasts only twenty to twenty-five years. Because modern solar panels last twenty-five to thirty years, installing solar over worn underlayment is a common mistake. If the underlayment fails ten years into your solar system life, you must pay to remove the solar panels, replace the paper, and reinstall the array.
The Three Main Tile Roof Mounting Methods
Professional solar installers use three primary mounting methods for tile roofs. Each method handles roof penetrations, water drainage, and tile preservation differently.
1. Tile Replacement Mounts (The Modern Standard)
Tile replacement mounts are widely considered the gold standard for residential tile solar. Instead of drilling or cutting your existing tiles, the installer removes individual roof tiles where brackets are needed. In their place, the crew installs an engineered aluminum flashing shaped to mimic the exact profile of your roof tile.
- How it works: A heavy-duty base plate bolts directly into the wood rafter. An all-metal replacement tile with an integrated mounting post fits over the base plate, interlocking with neighboring tiles.
- Key advantage: Zero tile cutting. Your original tiles remain intact and can be saved as future spares.
- Water protection: Precision-formed flashings overlap surrounding tiles naturally, preserving factory roof water channels.
2. Stainless Steel Tile Hooks
Tile hooks are durable, S-shaped metal arms made of thick stainless steel. The base of the hook attaches to the roof rafter beneath the tile, and the arm curves around the edge of the tile to hold the solar rail above.
- How it works: The installer lifts a tile, bolts the hook plate to the wood framing, adds waterproof flashing, and lowers the tile back into position.
- The challenge: Because the hook arm passes beneath the tile, installers must notch or grind a small slot on the underside of the overlapping tile using an angle grinder. If the notch is cut too shallow, the tile will rest on the metal hook and crack under wind pressure.
- Best use: Sturdy concrete flat tiles and curved S-tiles where replacement flashings are unavailable or too costly.
3. The “Comp-Out” or Picture-Framing Method
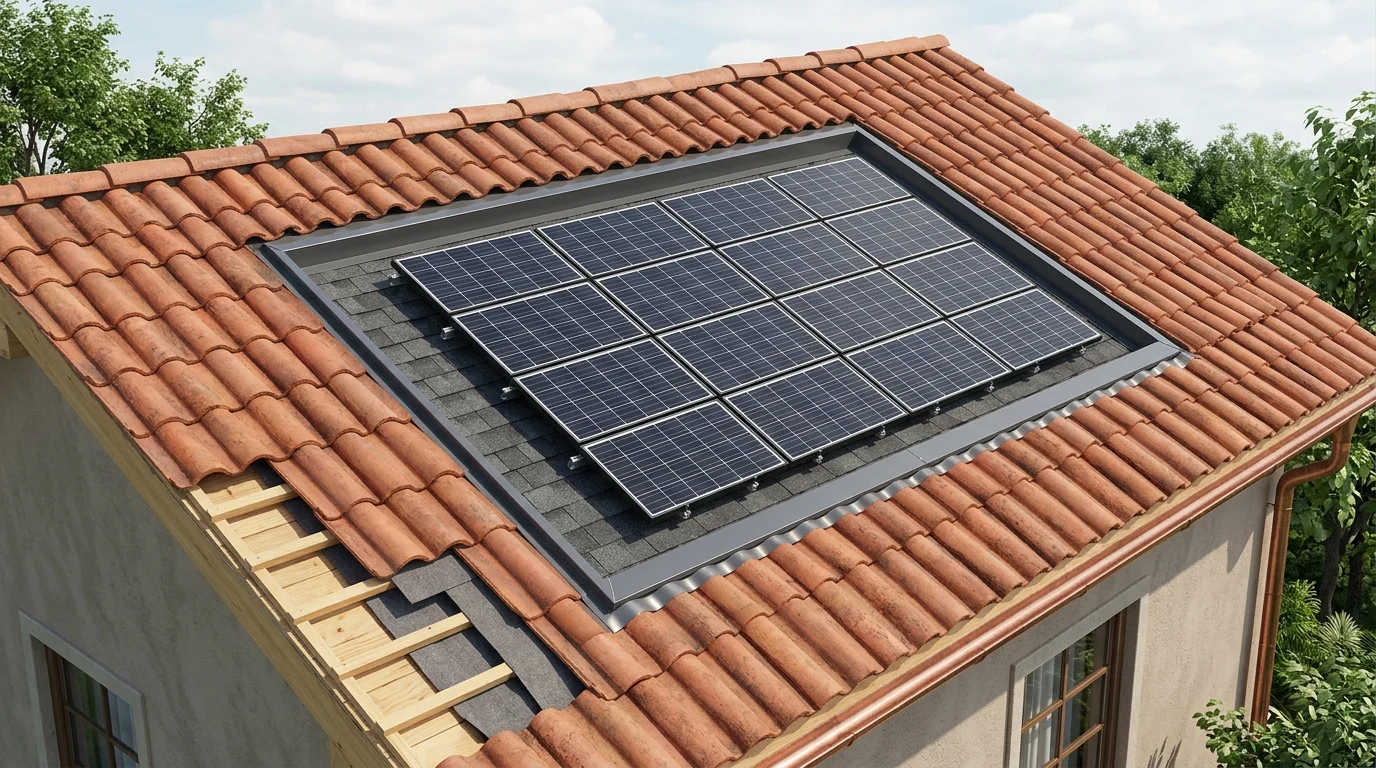
On brittle Spanish clay roofs or historic homes with discontinued tiles, installers often recommend a comp-out. In this approach, crews remove all tiles within the footprint of the solar array and lay down high-grade composite asphalt shingles in that specific area.
- How it works: The solar panels mount easily to the asphalt shingle surface using standard roofing mounts. Installers place custom perimeter transition flashing around the entire array to seal the gap between the shingle cutout and surrounding tiles.
- Key advantage: Completely eliminates tile breakage beneath the panels. It also speeds up installation and provides rock-solid leak protection.
- Aesthetic look: From ground level, the black solar panels completely hide the shingle area. The border tiles frame the array like a picture frame.
Tile Roof Mounting Methods Compared
Examine how the top three installation methods perform on durability, leak protection, and aesthetics.
Tile Replacement Mounts
Swaps original tiles for engineered aluminum flashing tiles. Eliminates tile cutting, protects original tiles, and delivers superior long-term weather sealing.
Tile Hooks
Curved stainless steel arms slip under tiles. Requires precise angle grinding on tile edges. Works well on sturdy flat concrete tiles with experienced crews.
Comp-Out Picture Frame
Replaces tile beneath panels with asphalt shingles and edge flashing. Ideal for fragile, vintage, or lightweight tiles where walking causes widespread cracks.
The Comp-Out Picture Framing Method
A recessed inset of durable composite shingles sits beneath the solar array, bordered by raised perimeter tiles and heavy-gauge aluminum flashing. The panels sit lower to the roofline while surrounding tiles remain completely untouched.
Step-by-Step Tile Roof Solar Installation
Installing solar on tile requires careful steps to protect the home and equipment. Here is how a professional crew completes the project:
Roof & Underlayment Inspection
The surveyor climbs into the attic to check rafter spacing, structural load capacity, and signs of past water leaks. On the roof, the crew inspects tile condition and underlayment elasticity to ensure the roof is ready for a thirty-year solar lifespan.
Tile Removal & Framing Layout
Installers map out the solar array layout using chalk lines. Crew members carefully lift and set aside target tiles along structural rafters. Workers wear soft-soled boots and use foam walking pads to prevent incidental cracking.
Fastening Brackets & Flashing
Installers drive heavy lag bolts into the center of wood rafters. They apply roofing sealant and secure secondary metal flashings over the underlayment. Next, they install tile replacement mounts or notched hooks to create a watertight seal.
Racking, Wiring & Panel Attachment
Workers attach lightweight aluminum rails to the roof mounts, level the racking system, and secure microinverters or optimizers. Solar modules are clamped to the rails, and all wiring is tucked neatly out of weather reach.
How Much Does Solar on a Tile Roof Cost?
Solar panel equipment costs the same regardless of roof type. However, tile roofs require more labor hours, specialized attachment hardware, and extra care. Because of this, installers charge a tile roof adder.
On average, installing solar on a tile roof costs $0.25 to $0.75 more per watt than a standard asphalt shingle roof. For a typical 8-kilowatt home system, this adds roughly $2,000 to $6,000 to the total project cost before tax credits.
Here is a breakdown of typical tile solar costs and labor considerations:
| Tile Material Type | Fragility Level | Mounting Method | Typical Cost Adder (8 kW System) |
|---|---|---|---|
| Flat Concrete Tile | Moderate | Tile Hooks or Replacement Mounts | $1,500 to $2,500 |
| Curved S-Tile (Concrete) | Moderate to High | S-Profile Replacement Mounts | $2,000 to $3,500 |
| Spanish Clay Barrel Tile | Very High | Tile Replacement Mounts or Comp-Out | $3,000 to $5,000 |
| Lightweight Clay Tile | Extreme | Comp-Out Picture Framing | $3,500 to $6,000 |
| Natural Slate Tile | High | Specialized Slate Hooks with Flashing | $3,000 to $5,500 |
What Makes Up the Tile Adder?
- Slower Installation Speed: A shingle solar job often takes one full day. A tile roof installation usually takes two to three days because crews must carefully move and replace tiles.
- Specialized Mounting Brackets: Standard L-foot mounts for shingles cost under $10 each. Engineered tile replacement flashings cost $30 to $50 each. A typical 8 kW system uses thirty to forty mounts, adding $800 to $1,600 in hardware alone.
- Spare Tiles & Breakage Reserves: Reputable installers budget for replacement tiles in case a few break during the job. They match your existing tile color and manufacturer.
Important Questions to Ask Your Solar Installer
Before signing a solar installation contract for your tile roof, ask these essential questions:
- What mounting method will you use on my roof? Avoid contractors who say they drill through tiles without removing them. Ask for tile replacement mounts or properly notched tile hooks.
- How do you handle broken tiles? Will the installer replace broken tiles with exact matching pieces at their expense? Ensure this commitment is written clearly into the contract.
- Is the underlayment in good condition? If your roof is more than twenty years old, ask if a reroof or localized underlayment replacement is recommended before panels go up.
- What is your roof penetration warranty? Look for a workmanship and leak warranty of at least ten to twenty-five years that specifically covers roof penetrations.
Frequently Asked Questions
No, as long as the work follows manufacturer standards. Reputable installers use approved mounting brackets and flashing that preserve roof warranties. Some roofing manufacturers require a certified roofer to perform tile removals and resets. Check with your roof manufacturer before installation begins.
Minor breakage can occur, especially on brittle clay roofs. However, experienced installers plan for this by keeping spare tiles on hand and replacing any damaged tiles before inspection. Always ensure your contract states that the contractor will replace any broken tiles at no additional cost.
If your tile profile is no longer made, breaking tiles can be stressful. In this situation, the comp-out method is the best option. Workers remove tiles from under the array without breaking them, and store those tiles as spare parts for future roof repairs.
Yes. Solar panels block harsh sunlight, ultraviolet rays, rain, and hail from directly striking your roof tiles. Tiles sitting underneath solar panels often experience less weathering than exposed tiles, helping them last longer.
Yes. Concrete tiles are thicker and more durable than traditional clay tiles. Installers can walk on concrete tiles with greater confidence and notch edges cleanly with lower risk of cracking. Spanish clay is much more brittle and requires extra caution.